A crane load chart is the official reference that defines exactly how much weight a crane can safely lift under specific conditions. Every crane, from small mobile cranes to large all-terrain cranes, relies on load charts to prevent tipping, structural failure, and unsafe lifting operations.
Many crane accidents occur not because the crane is defective, but because the load chart was misunderstood or ignored. Knowing how to read a crane load chart allows operators, engineers, and lift planners to verify safe lifting capacity, plan lifts accurately, and ensure safe crane operation. This guide explains load chart components, provides real examples, and shows the exact step-by-step process used in real-world lift planning.
Quick Answer: How to Read a Crane Load Chart in 5 Steps
If you need a fast answer, follow these five essential steps:
- Identify the boom length being used.
- Measure the working radius from crane center to load.
- Find the correct boom length and radius intersection on the chart.
- Read the rated lifting capacity at that intersection.
- Ensure total load weight, including rigging and hook, is below rated capacity.
This process determines whether a lift is safe and within the crane’s operating limits.
What a Crane Load Chart Is and Why It Determines Safe Lifting Capacity
A crane load chart is a manufacturer-certified table showing the maximum safe lifting capacity for different crane configurations. It defines safe lifting limits based on:
- Boom length
- Working radius
- Boom angle
- Counterweight configuration
- Outrigger setup
- Crane orientation
These limits are not recommendations. They represent the maximum load the crane can safely lift without tipping or structural damage. Crane capacity changes depending on configuration because cranes operate based on leverage and stability. As the distance between the crane and load increases, the tipping force increases, reducing safe lifting capacity.
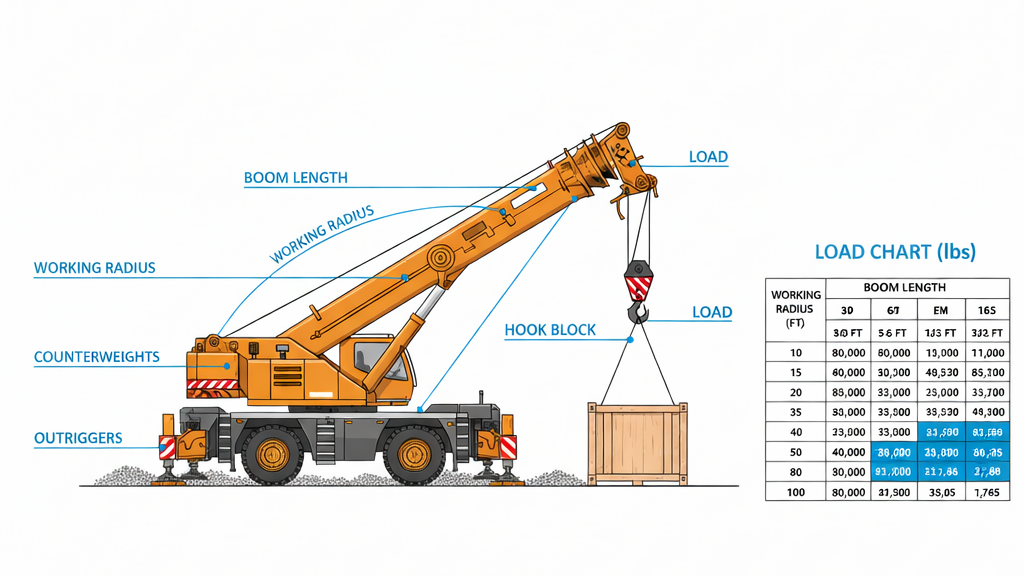
Anatomy of a Crane Load Chart: Understanding Every Component
Understanding each component is essential before interpreting a load chart.
Boom Length
Boom length is the distance from the crane pivot point to the boom tip. Longer boom lengths allow greater reach but reduce lifting capacity because the load is farther from the crane’s center of gravity.
- Example: 40 ft boom → higher lifting capacity | 80 ft boom → lower lifting capacity
- Note: Longer booms increase leverage, which reduces stability.
Working Radius
Working radius is the horizontal distance from the crane’s center of rotation to the load. This is the most critical factor affecting lifting capacity. Even small increases in radius significantly reduce lifting capacity.
- Example: 20 ft radius → high capacity | 40 ft radius → much lower capacity
- Note: Working radius directly determines crane stability.
Rated Lifting Capacity
Rated capacity is the maximum safe weight the crane can lift under specific conditions. This value is determined by the crane manufacturer and includes built-in safety margins. Exceeding rated capacity risks tipping or crane damage.
Boom Angle
Boom angle affects lifting capacity by changing leverage. Higher boom angles keep the load closer to the crane center, improving stability and lifting capacity. Lower boom angles increase tipping force and reduce lifting capacity.
Outrigger Configuration
Outriggers increase crane stability by expanding the base width. Common configurations include:
- Fully extended outriggers: Maximum capacity
- Partially extended outriggers: Reduced capacity
- On rubber (no outriggers): Lowest capacity
Outriggers significantly improve lifting safety.
Counterweight
Counterweights balance the load and prevent tipping. Additional counterweight allows cranes to safely lift heavier loads. Removing counterweight reduces safe lifting capacity.
Structural Limit vs. Stability Limit
- Structural limit: The maximum load crane components can handle safely.
- Stability limit: The maximum tipping threshold.
Manufacturers set rated capacity below both limits to ensure safe operation.
How to Read a Crane Load Chart Step by Step
Professional crane operators follow this exact workflow:
Step 1: Identify crane configuration
Confirm crane setup:
- Boom length
- Counterweight installed
- Outrigger configuration
Load charts only apply when crane setup matches chart conditions.
Step 2: Measure working radius
Measure the horizontal distance from the crane center to the load position.
- Example: Working radius = 35 ft
- This measurement is critical for accurate load chart interpretation.
Step 3: Locate boom length and radius intersection
Load charts use a grid format.
- Top row: Boom length
- Left column: Working radius
- Find where the boom length column and radius row intersect.
Step 4: Read rated lifting capacity
The number at the intersection is the maximum safe lifting capacity.
Example:
- Boom length: 70 ft
- Working radius: 35 ft
- Rated capacity: 7,800 lbs
This is the maximum allowable load.
Step 5: Calculate total load weight
Total load includes more than just the object. Include:
- Load weight
- Rigging weight
- Hook weight
- Lifting attachments
Example Calculation:
- Equipment weight: 6,500 lbs
- Rigging: 600 lbs
- Hook: 300 lbs
- Total load = 7,400 lbs
Step 6: Confirm safe lifting condition
Compare total load weight to rated capacity.
- Rated capacity: 7,800 lbs
- Total load weight: 7,400 lbs
Result: Lift is safe because total load is below rated capacity.
Real Crane Load Chart Example with Full Calculation
Consider lifting an industrial generator onto a rooftop.
Crane configuration:
- Boom length: 90 ft
- Working radius: 45 ft
- Outriggers: fully extended
- Counterweight: installed
Load chart shows:
Rated capacity: 5,900 lbs
Load breakdown:
- Generator: 5,200 lbs
- Rigging: 400 lbs
- Hook: 250 lbs
- Total load weight: 5,850 lbs
Result: Lift is safe because load is below rated capacity. If total load exceeded 5,900 lbs, the lift would be unsafe.
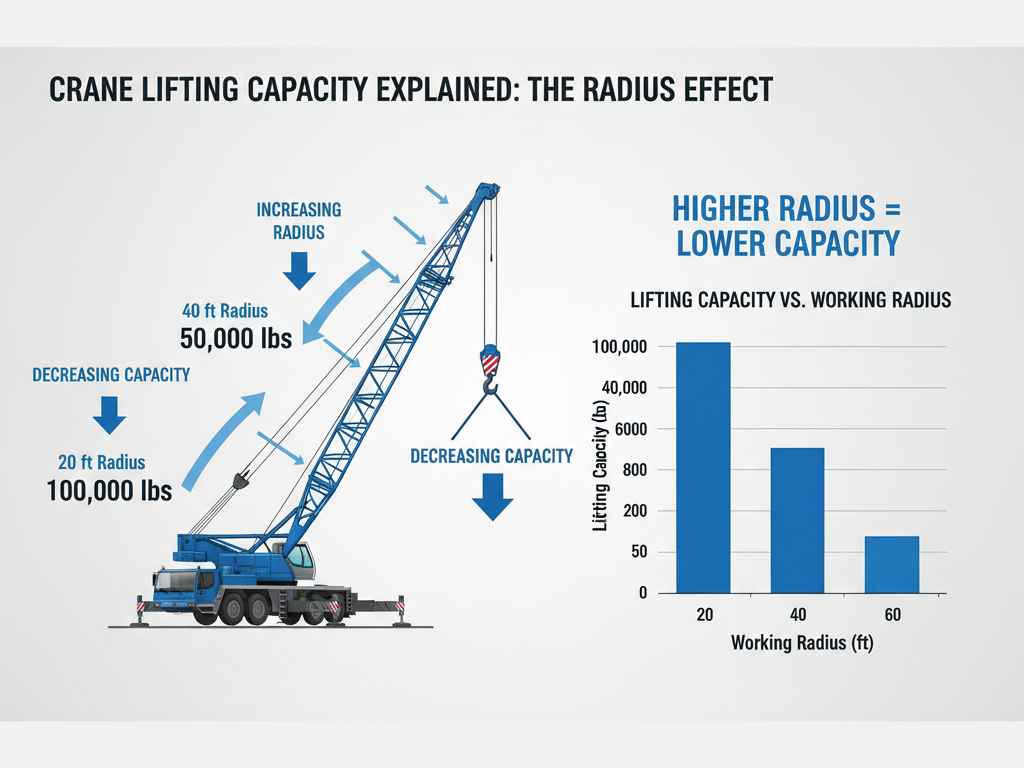
How Working Radius Affects Crane Capacity
Working radius has the greatest effect on lifting capacity. As radius increases, tipping force increases, reducing capacity. Minimizing working radius improves lifting safety.
Example Capacity Reduction:
| Working Radius | Lifting Capacity |
| 20 ft | 18,000 lbs |
| 30 ft | 11,000 lbs |
| 40 ft | 7,000 lbs |
| 50 ft | 4,800 lbs |
| 60 ft | 3,200 lbs |
How to Use a Working Range Diagram to Find Crane Radius
Working range diagrams show boom angle and reach. To find working radius:
- Identify boom length
- Follow boom angle line
- Find intersection with radius scale
This determines the actual working radius. Working range diagrams help operators visualize crane reach and capacity.
How Crane Configuration Changes Load Chart Capacity
Crane configuration dramatically affects lifting capacity:
- Fully extended outriggers provide maximum stability.
- Partially extended outriggers reduce capacity.
- Additional counterweight increases lifting capacity.
- Boom extension reduces lifting capacity.
Always use the load chart matching crane configuration.
How to Calculate Whether a Lift Is Safe Using a Load Chart
Follow this professional safety verification method:
- Determine rated capacity from load chart.
- Calculate total load weight.
- Compare total load with rated capacity.
- Ensure load is below capacity.
Always maintain a safety margin when possible.
Common Mistakes When Reading Crane Load Charts
These mistakes frequently cause crane accidents:
- Confusing boom length and working radius: Boom length and radius are different. Capacity depends primarily on radius.
- Ignoring rigging and hook weight: Total load includes rigging and lifting equipment. Ignoring rigging weight leads to overload.
- Using incorrect crane configuration: Load charts apply only to specific crane setups. Incorrect setup reduces safe lifting capacity.
- Assuming maximum crane capacity applies everywhere: Maximum capacity applies only at minimum radius. Capacity decreases as radius increases.
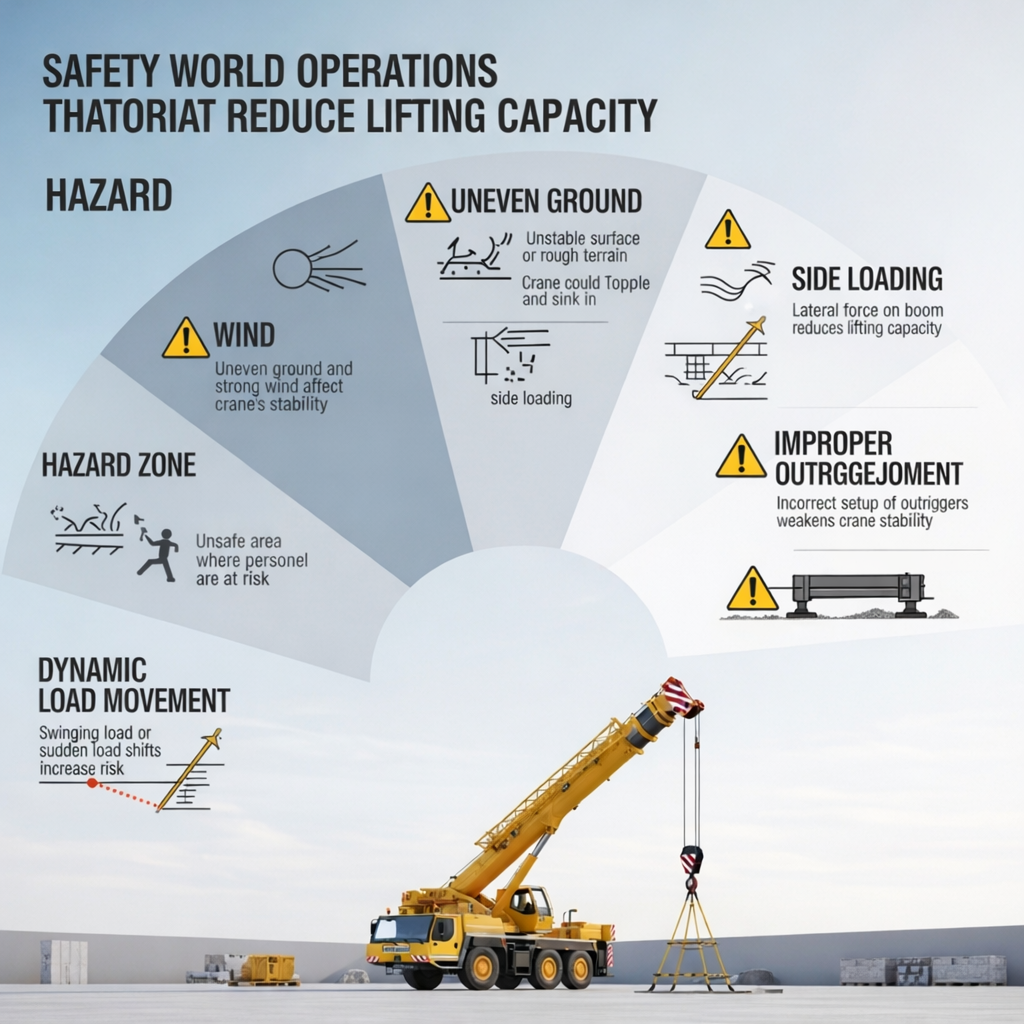
Real-World Factors That Reduce Crane Lifting Capacity
Environmental and operational factors affect lifting safety. Operators must consider real-world conditions beyond load chart values:
- Increases load force and instability.
- Uneven ground: Reduces crane stability.
- Side loading: Creates dangerous forces.
- Improper outrigger deployment: Reduces stability.
- Dynamic load movement: Increases stress.
Crane Load Chart Terms and Symbols Explained Clearly
- Rated load: Maximum safe lifting capacity.
- Working radius: Horizontal distance from crane center to load.
- Boom length: Distance from pivot to boom tip.
- On outriggers: Crane supported by outriggers.
- On rubber: Crane supported by tires.
- Structural limit: Maximum structural load limit.
- Stability limit: Maximum tipping threshold.
Why Crane Load Charts Are Critical for Preventing Crane Tipping Accidents
Crane load charts prevent unsafe lifting conditions that can cause tipping or equipment damage. When load exceeds crane capacity, tipping can occur suddenly. Load charts ensure lifting remains within safe stability limits. Understanding load charts protects operators, equipment, and job site safety.
FAQ: Crane Load Chart Questions Operators and Engineers Ask
How do you calculate crane load capacity?
Locate boom length and working radius in load chart and read rated capacity at their intersection.
What is working radius in a crane load chart?
Working radius is the horizontal distance from crane center to load and is the primary factor affecting lifting capacity.
Why does crane capacity decrease with distance?
Greater distance increases tipping force due to leverage, reducing safe lifting capacity.
Does the crane load chart include rigging weight?
No. Rigging, hook, and lifting gear must be added to the load weight.
Can a crane lift maximum capacity at full boom extension?
No. Maximum capacity occurs at minimum radius. Full extension reduces capacity significantly.
Conclusion: How to Safely Use Crane Load Charts for Lift Planning
Crane load charts define the maximum safe lifting capacity based on boom length, working radius, and crane configuration. Understanding how to read and apply load chart information allows operators and lift planners to safely plan lifts, avoid overload conditions, and prevent crane tipping.
By identifying boom length, measuring working radius, calculating total load weight, and verifying rated lifting capacity, operators can ensure safe crane operation. Proper use of crane load charts is essential for lifting safety, equipment protection, and accident prevention on construction sites.


